 Clos
 Closentry
Setup Guide
Installing the app, the free trial and licence keys, setting up a team folder, adding people, and where data is kept. For IT and the finance admin.
Contents
- 1What you need
- 2Install on a computer
- 3First start
- 4Free trial and licence keys
- 5One person or a team
- 6Set up a team folder
- 7Add people and roles
- 8Colleagues join the team
- 9Where data is kept
- 10Backups and record keeping
- 11Security and privacy
- 12Updating and removing the app
- 13Command line and automation
- 14Troubleshooting
Closentry.exe to each PC and double-click it. There is nothing to install and you don't need admin rights or Python. For a team, put a shared folder on a network drive or OneDrive / SharePoint. One person creates the team there, adds colleagues by their Windows login, and everyone else chooses Join a team.1. What you need
| Item | Requirement |
|---|---|
| Operating system | Windows 10 or Windows 11, 64-bit |
| Browser engine | Microsoft Edge, which is part of Windows 10/11. The app's window is an Edge app window; nothing else is installed. |
| Disk space | About 15 MB for the program, plus your data (usually a few MB per month) |
| Memory | 4 GB or more. Bank statements, ledgers and trial balances of up to 50 MB each (about 500,000 lines) are accepted; evidence attachments up to 100 MB. |
| Rights | A normal user account. No administrator rights are needed. |
| Internet | Not needed. Licences are checked offline and no data leaves the computer. |
| Python | Not needed. The .exe carries its own runtime. |
| For a team | A shared folder that every member can reach: a network share (\\server\finance\Reconciliation) or a OneDrive / SharePoint folder synced to every PC |
2. Install on a computer
- Copy
Closentry.exeto a permanent place, for exampleC:\Users\<you>\Apps\Closentry\or a software share. Don't run it straight from the Downloads folder or from inside a zip file. - Optional: right-click the file, choose Show more options → Send to → Desktop (create shortcut), and pin the shortcut to Start or the taskbar.
- Double-click to start. The first start takes a few seconds while Windows unpacks the program. Later starts are faster.
build_exe.py --sign) shows the publisher's name instead.A second copy is available for scripts and scheduled jobs: Closentry-cli.exe (see section 13). Most users don't need it.
3. First start
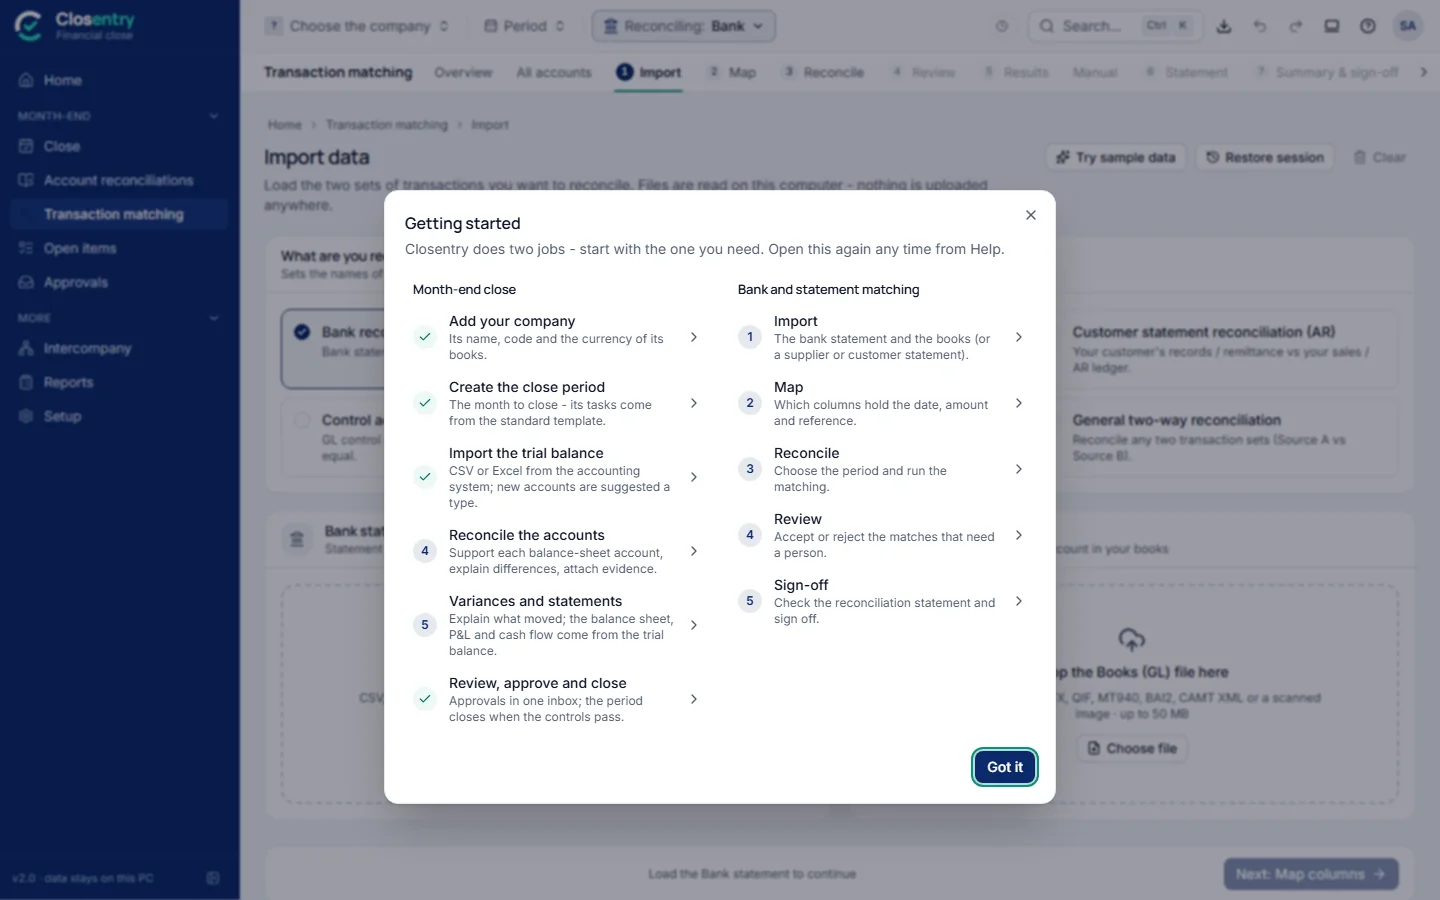
The app opens in its own window. The first time, a Getting started panel shows the two jobs Closentry does, each step by step: the month-end close (company, close period, trial balance, account reconciliations, approval) and bank and statement matching (import, map, reconcile, review, sign-off). Each step opens its screen and gets a tick when it is done. Open the panel again at any time from the ? button, where the User guide, this Setup guide and the tutorial videos are too.
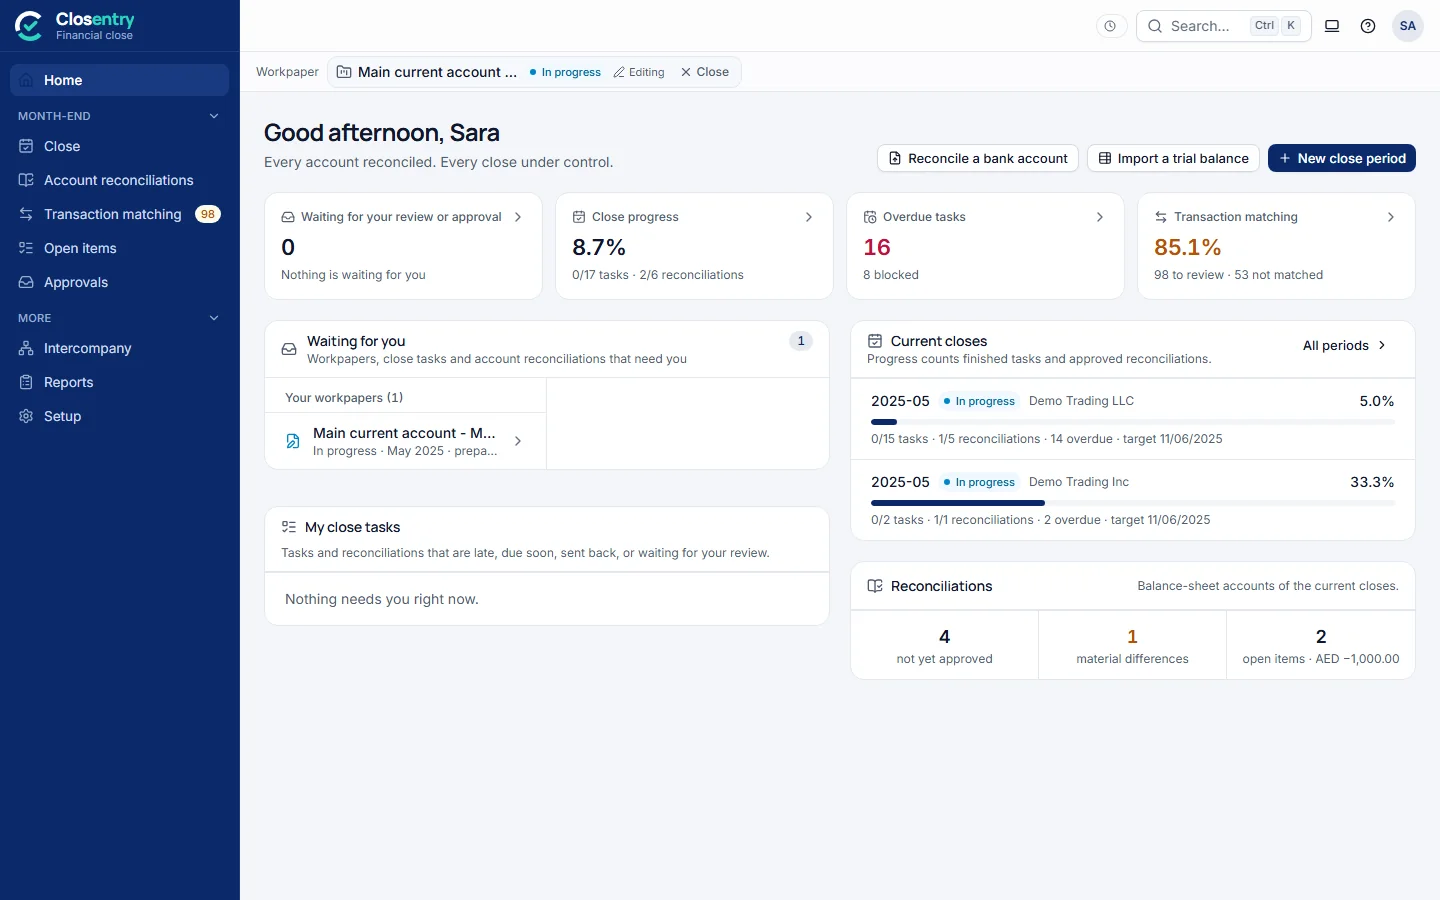
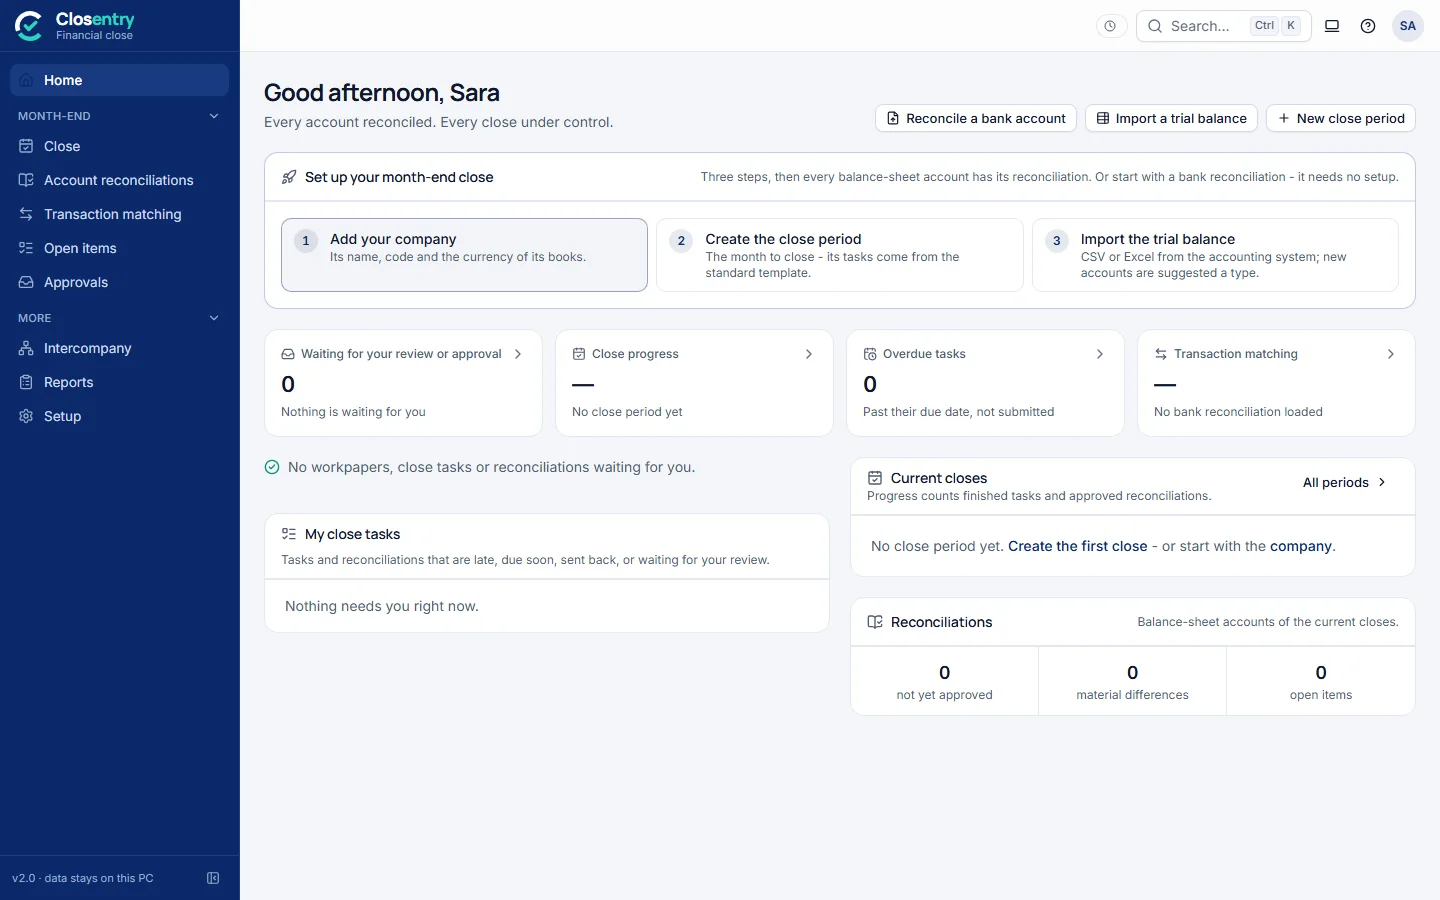
Home then shows Set up your month-end close until the first trial balance is in: add your company, create the close period, import the trial balance. A bank reconciliation needs no setup.
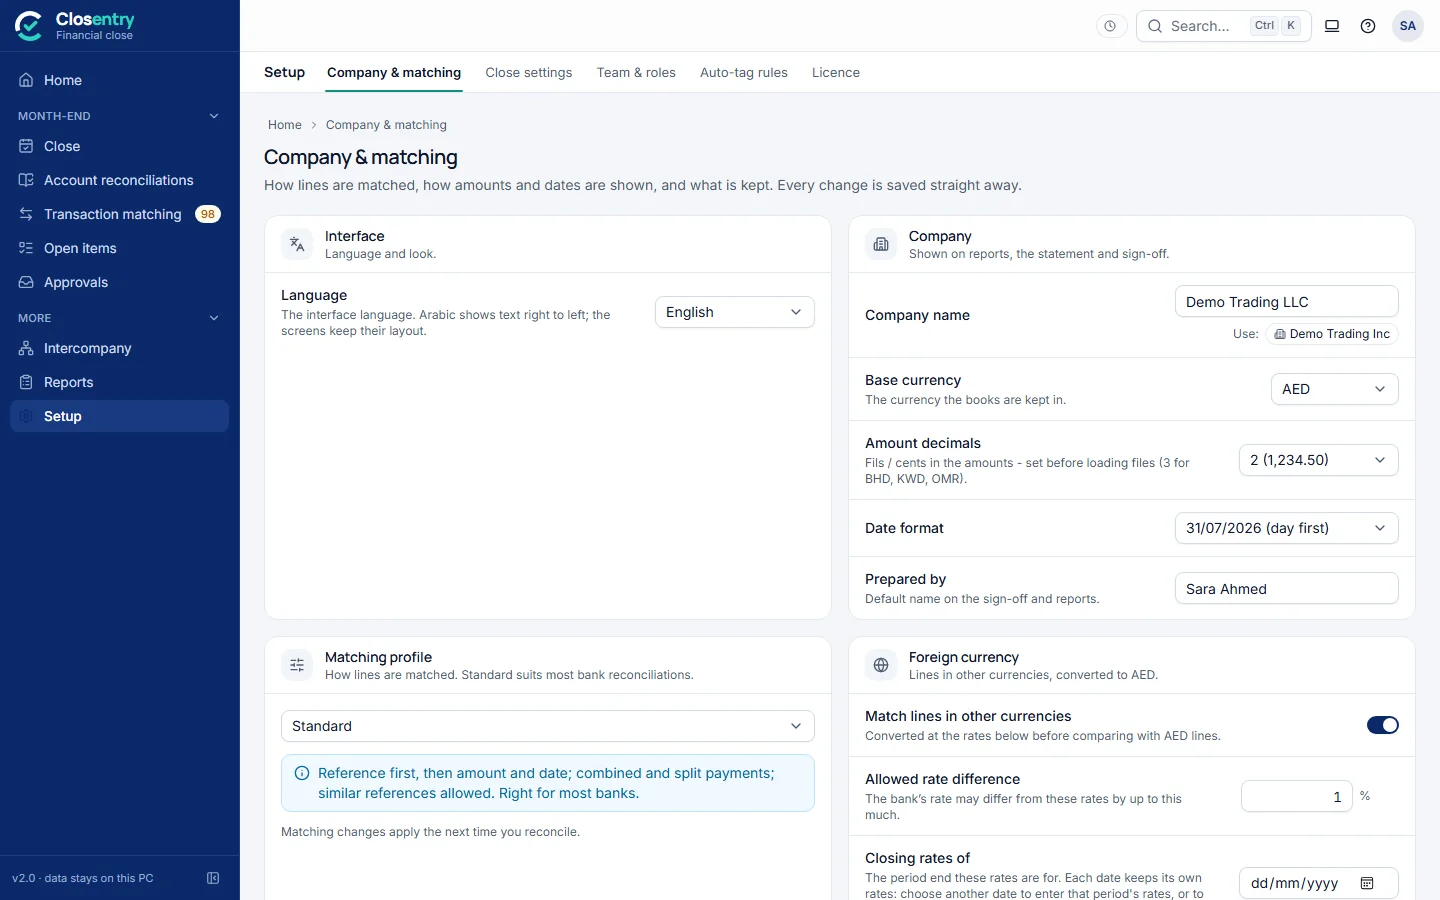
Before the first real reconciliation, open Setup (side menu → More → Setup › Company & matching) and set:
- Company name and Prepared by. Both appear on reports and on the sign-off. The companies of the close are offered as one-click choices, so the same name is used everywhere.
- Base currency (AED by default), amount decimals (3 for BHD, KWD, OMR) and the date format (day first by default). Under Dates, the weekend days: Saturday + Sunday, or Friday + Saturday.
- Optional, under Privacy & compliance: Encrypt saved data with my Windows login, Mask IBANs in exports, and the cash-reporting threshold (AED 55,000 by default).
4. Free trial and licence keys
Every feature is open for 30 days from the first start on a computer. The Licence page (side menu → Setup › Licence) shows the days left, what the current plan includes, and this computer's code.
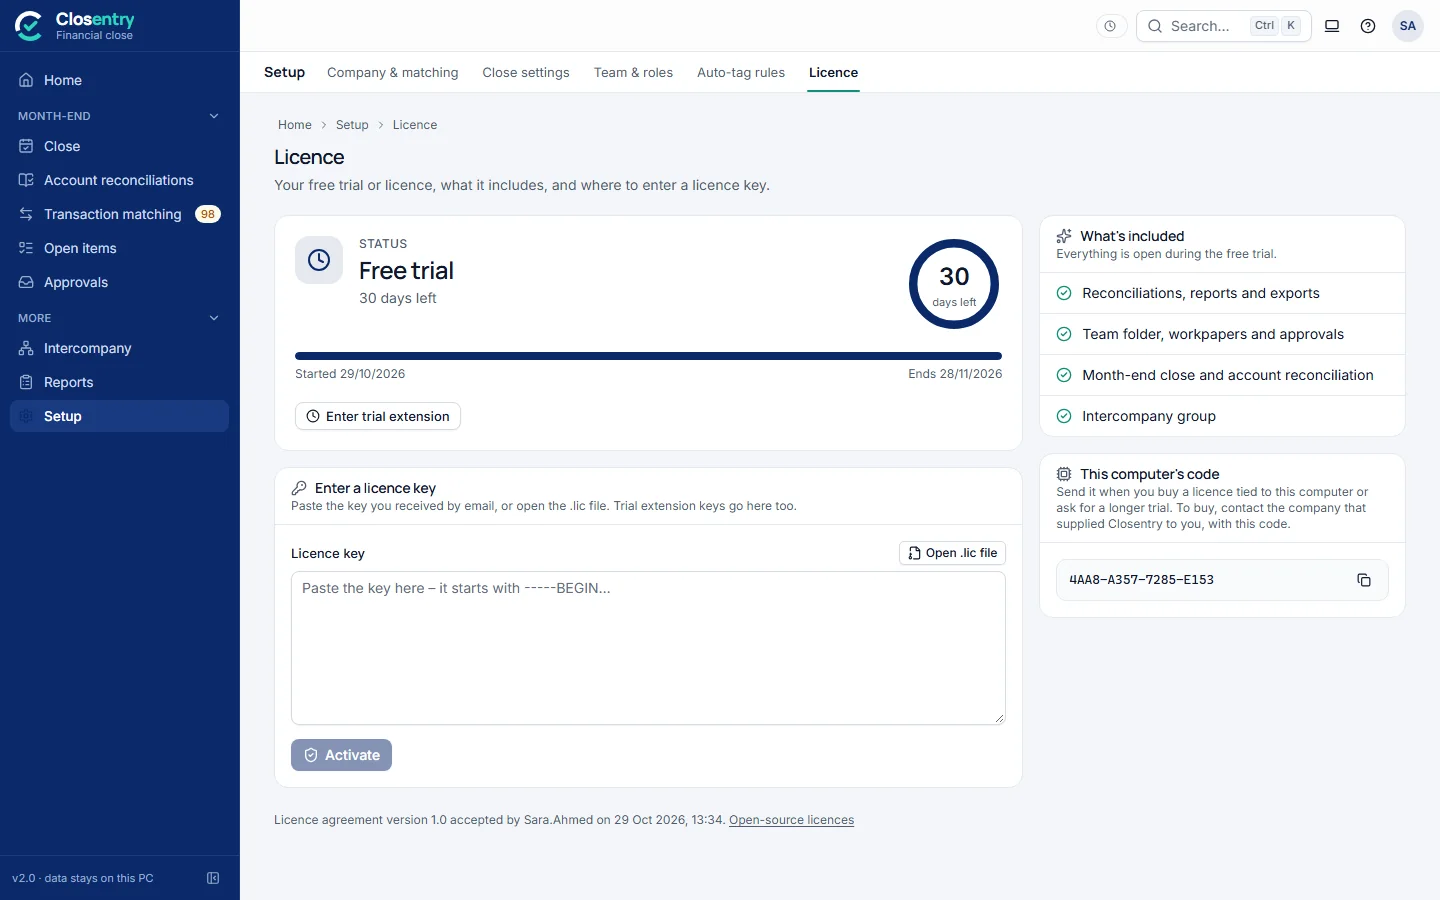
Enter a licence key
- Open Licence.
- Paste the key from the email (it starts with
-----BEGIN), or click Open .lic file and choose the file. - Click Activate. The status changes to the plan name and its end date.
Plans
| Plan | People | Includes |
|---|---|---|
| Starter | 1–2 | Reconciliations, matching, the audit trail, reports and exports, and the team folder with workpapers, review and approval |
| Business | 3–20 | Plus the month-end close (periods, tasks, account reconciliations) |
| Enterprise | 21–100 | Plus the intercompany group (all pairs, netting, eliminations) |
- Seats count the people who prepare, review or approve. Viewers are free.
- Earlier Team plan: it is no longer offered, but existing Team keys stay valid and can be renewed.
- One licence for the whole team: the team admin activates the key once. It is stored in the team folder and covers every member.
- Licence tied to one computer: when you buy, send the code shown under This computer's code. If the Licence page has a Buy a licence button it opens the shop; otherwise contact the company that supplied Closentry to you, with that code.
- Trial extension keys add days for a pilot. Each one works once and goes in the same box.
HKCU\Software\ReconciliationPro). Setting the clock back or editing the record ends the trial.5. One person or a team
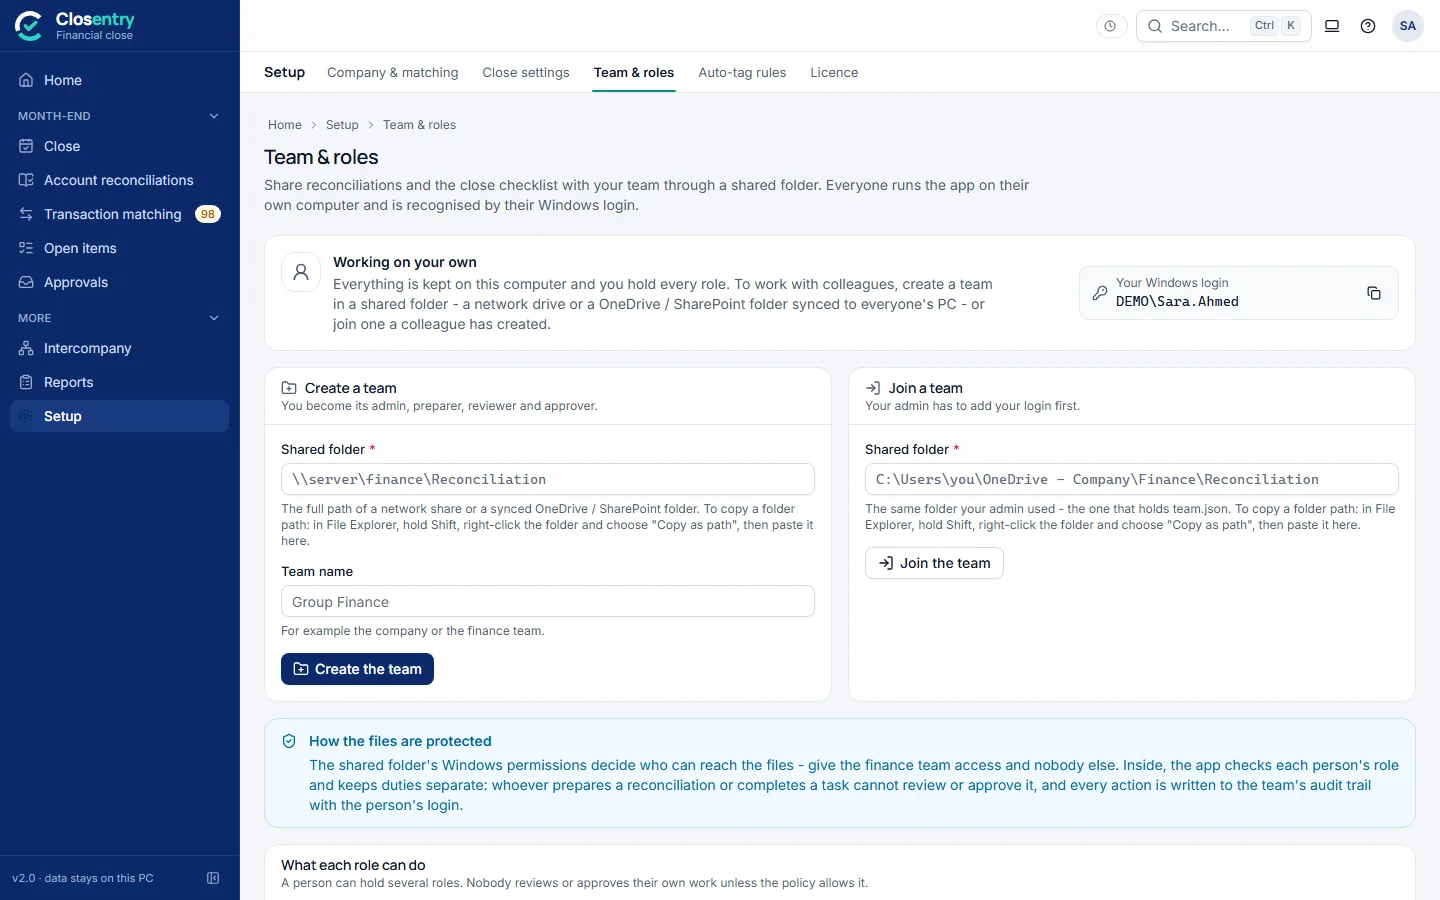
People are recognised by their Windows login (for example CONTOSO\jsmith), which is read from Windows. There is no separate password and nothing to log out of. Whoever is signed in to Windows is the person using the app. Lock the PC (Win+L) when you step away.
6. Set up a team folder
IT or the finance admin does this once.
- Create the folder. Use a network share, for example
\\fileserver\Finance\Reconciliation, or a folder in a SharePoint document library that every member syncs with OneDrive. Every PC must see the same files. - Set Windows permissions. Give the finance team group Modify rights on the folder and remove everyone else. Give auditors Read rights if needed. The app enforces roles inside the folder; Windows decides who can reach it at all.
- Copy the folder path. In File Explorer, hold Shift, right-click the folder and choose Copy as path.
- Create the team. The team admin opens Team & roles, pastes the path under Create a team → Shared folder, enters a team name (for example "Group Finance") and clicks Create the team. That person becomes the admin, preparer, reviewer and approver.
What the team folder holds
| File | Contents |
|---|---|
team.json | People, roles and the approval policy |
workpapers\<id>.meta.json | One reconciliation: status, people, history, comments |
workpapers\<id>.doc.json | Its data (files read, mapping, matches) |
workpapers\<id>.lock | Who is editing it now (one editor at a time) |
workpapers\deleted\ | Removed workpapers. They can be restored. |
closedata\ | The close: entities, periods, tasks, accounts, trial balances, account reconciliations, reconciling items (written under the folder's lock, with a recovery journal) |
evidence\ | Supporting documents attached to tasks, reconciliations and items |
audit.json | The team's audit log, hash-chained |
audit.json. A change made outside the app shows on the Audit trail page as a broken chain. Restore from a backup instead.7. Add people and roles
After the team is created, Team & roles shows the People list and the Approval policy.
- Ask each colleague for their Windows login. Their own Team & roles page shows it, with a copy button.
- Under People, enter the login (
DOMAIN\user), the name and optionally the email, then tick their roles. - Set the Approval policy:
- Approval levels: 1 (reviewer approves) or 2 (reviewer, then approver).
- Need a complete sign-off checklist to submit: when this is on, a preparer can't submit with open points. When it is off, they can submit with a written comment, and the comment is recorded.
- Allow people to approve their own work: only for a one-person team. When it is off, nobody reviews or approves their own work.
- Edit lock timeout: after how many hours a forgotten edit lock (for example a PC switched off with a workpaper open) stops counting, so someone else can edit.
- Click Save people and policy.
| Role | Can |
|---|---|
| Admin | Add people, set roles, the approval policy, the close templates and the close settings (with automatic sign-off), the bank accounts of All accounts and their automatic sign-off |
| Preparer | Prepare reconciliations, submit them, complete close tasks; import and run the statements of All accounts |
| Reviewer | Review and give the first-level approval, review close tasks, send work back |
| Approver | Give the final approval, mark tasks not applicable, close and reopen the month, reopen an approved workpaper |
| Viewer | Open everything, change nothing. Viewers don't count as licence seats. |
A person can hold several roles. Even with several roles, separation of duties applies: whoever prepared a workpaper or completed a task cannot review or approve it, and the final approver must be a different person from the first reviewer.
8. Colleagues join the team
- The colleague installs the app (section 2) and starts it.
- They open Team & roles, paste the same folder path under Join a team and click Join the team.
- If the message says their login is not in the team, the admin adds it (section 7) and they try again.
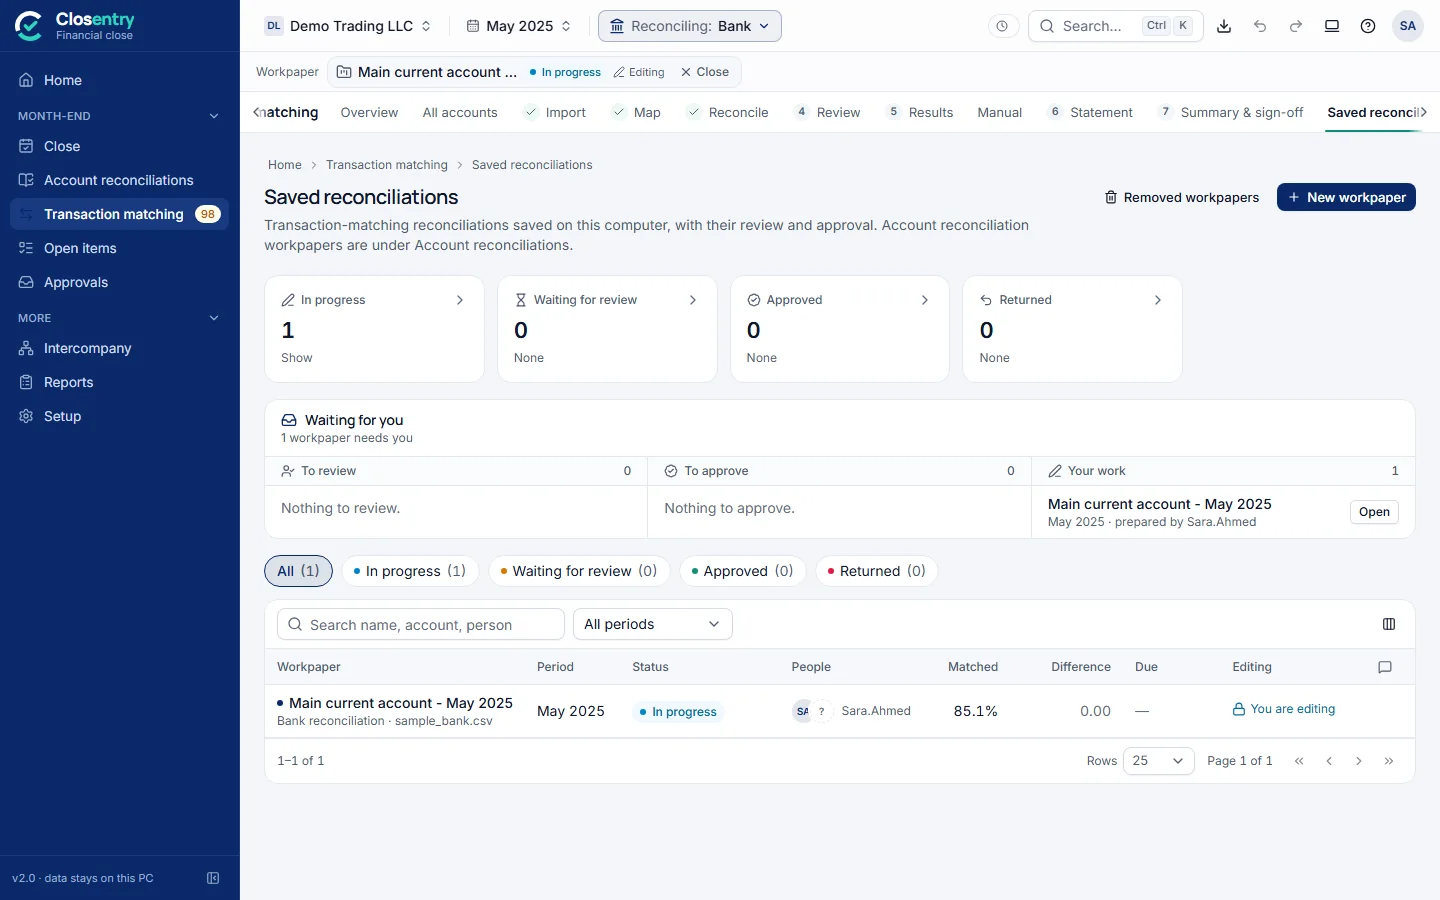
From now on, Workpapers, the close screens, Approvals and the Waiting for you panel on Home show the shared work.
9. Where data is kept
| Location | Contents |
|---|---|
C:\Users\<you>\.bank_reconciliation_pro\ | Personal data: the current session, settings, saved column mappings, the audit trail and its archives, period history, auto-tag rules, report layouts, the trial record; working alone, also All accounts |
| The team folder | Shared workpapers, the close data and evidence, All accounts (bank accounts and monthly runs), team audit log, team licence |
%LOCALAPPDATA%\Closentry\app.log | The program log and any start-up error, useful for support. Help (?) → Open log folder opens this folder. |
HKCU\Software\ReconciliationPro | The trial start (registry) |
Main files in the personal folder
| File | Contents |
|---|---|
doc.json | The current session. It is restored at the next start. |
settings.json | Settings |
templates.json | Saved column mappings, applied automatically when the same layout comes back |
audit.json, audit-archive-*.json | Audit trail: every action with the user and computer, chained, archived and never trimmed |
history.json | Period snapshots, used for trends and brought-forward items |
rules.json, report_templates.json | Auto-tag rules, custom report layouts |
batch\ | All accounts: the bank accounts, one saved reconciliation per account and month, and files waiting for their account (in the team folder when working in a team) |
To keep the personal data somewhere else (for example on a backed-up drive), start the app with Closentry.exe web --data-dir "D:\Finance\Closentry" from a shortcut.
Saves are atomic, so a crash never leaves half a file. A damaged file is set aside as name.damaged-<time> and you are told at start-up.
10. Backups and record keeping
- Include both the personal data folder and the team folder in the company's normal backups.
- Keep records for as long as your retention policy requires. Close settings → Retention records each policy with its source and owner; the UAE examples it starts with are interpretations to confirm with your adviser, not legal advice. The audit trail is never trimmed. It rolls over into archive files, which must be kept too.
- Each user can also export a portable copy of a session: Export & print → Session file (
.brsession). - With Encrypt saved data with my Windows login switched on, the personal files can only be opened by the same Windows account on the same PC. Keep session exports as well if PCs are replaced often.
11. Security and privacy
- Local only. The engine listens on
127.0.0.1(this computer only), on a random port with a random key for each start. Nothing is reachable from the network, and only one copy runs per Windows user. - No cloud. Files are read on the PC. Nothing is uploaded, and the app makes no internet connections.
- Identity comes from Windows. Roles and separation of duties are enforced in the app, and access to the team folder is controlled by Windows permissions.
- Tamper evidence. The personal and team audit logs are SHA-256 chained. The Audit trail page shows Chain verified, or the first entry that was altered.
- Sign-off lock. A signed-off or approved reconciliation can't be changed. Unlocking asks for a reason, and the reason is recorded.
- Optional encryption: Encrypt saved data with my Windows login (Windows DPAPI) covers the session, audit trail and history. The month-end close database (
close.db) and evidence files are not included. - Disk encryption. To protect everything at rest, including the close database and evidence, turn on BitLocker (built into Windows Pro and Enterprise) on every PC and on the server or storage that holds the team folder, and keep folder permissions tight (section 6).
- Optional: IBAN masking in exports.
12. Updating and removing the app
Update
- Close the app on that PC.
- Replace
Closentry.exewith the new version, keeping the same name and place so shortcuts still work. - Start it. Data, settings, licence and team membership are kept, because they live outside the program file.
Update every member of a team to the same version within a few days of each other.
Remove
- Delete
Closentry.exeand its shortcuts. - Only if the data is no longer needed (check the record-keeping periods first): delete
C:\Users\<you>\.bank_reconciliation_proand%LOCALAPPDATA%\Closentry.
13. Command line and automation
Closentry-cli.exe reconciles two files without a window, for example in a scheduled task:
Closentry-cli.exe reconcile BANK.xlsx LEDGER.xlsx --out report.xlsx
Closentry-cli.exe reconcile STATEMENT.csv LEDGER.csv --type supplier --out report.csv
Closentry-cli.exe reconcile JUL.xls GL-JUL.xlsx --carry-forward open-jun.csv --save-open open-jul.csv
Exit codes: 0 means it ties out, 2 means a difference remains, 1 means a file or usage error. Run Closentry-cli.exe reconcile --help for every option. Closentry-cli.exe --selftest checks the installation.
14. Troubleshooting
| What you see | What to do |
|---|---|
| "Windows protected your PC" | Click More info → Run anyway, or have IT allow the file (section 2). |
| Antivirus quarantines the file | Restore it and add an exclusion for the file's path or hash. Unsigned single-file programs are sometimes flagged by mistake. |
| Nothing opens, or a message box with an error | Open %LOCALAPPDATA%\Closentry\app.log (if the app starts: Help (?) → Open log folder; if not: press Win+R and paste %LOCALAPPDATA%\Closentry) and send it to support. Check that Microsoft Edge is present and up to date. |
| "Closentry is already open" | Only one copy runs per Windows user. Use the window on the taskbar, or end Closentry.exe in Task Manager if it is stuck. |
| "The team folder cannot be reached" | Check the network drive, VPN or OneDrive sync, and that the folder path is the same on this PC. Then open the page again. |
| "You are not in this team yet" | The admin adds the exact login shown on the colleague's Team & roles page. |
| A workpaper says someone else is editing | Open it read-only, or ask them to close it. A forgotten lock stops counting after the edit-lock timeout set in the approval policy. |
| Everything is read-only | The trial or licence has ended (top bar and Licence page). Enter a key, or ask the team admin to renew the team licence. |
| The trial ended earlier than expected | The PC clock was set back or the trial record was edited. Correct the clock and contact the vendor for a trial extension key. |
| Audit trail shows a broken chain | A file was edited outside the app. Restore the folder from a backup, or keep the log as evidence and ask the auditor. |
| Scanned PDF reads badly | Ask the bank for an Excel, CSV, MT940 or CAMT export. OCR results are marked READ BY OCR - CHECK AMOUNTS. |
app.log (Help (?) → Open log folder). Don't send bank files unless you are asked to and allowed to.